Sunday, February 20, 2005

2005-02-20 IG Dreadnaught

Good night of modeling. I was worried the piece would not come together but in the end everything seemed to work in my favor, knock on the plastic keys of this keyboard.

My intent was to keep the cab forward look of the sentinel and beef this up. I think I was able to do that.


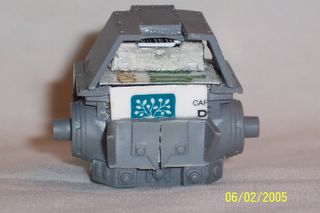
I first glued the main power plant to the back of the IG dread. The power plant was again reduced in size but I was happy with the end result.


I cut some plastic cardstock to house the power plant.

I cut the exhaust from the Dread in two added a small track shield that I cut down for the exhaust. I glued this to the side of the engine mount. Sorry about the picture.


I took one of the hatches from the tank spur and glued it to the top for a hatch.


To add some flash to the sides I glued the imperial eagle to the side of the additional armor.


Erik

Wednesday, February 16, 2005

2005-02-16 IG Dreadnaught

When Mars designed the weapons of my IG Dread they were to be a combination of the mass fire ideology of the Imperial Guard and rapid fire of a Gatling gun. This weapon was not an anti-armor weapon. This weapon only fires a little higher power beam than the stander hellgun.

This weapon does engage with a greater rate of fire, equaling the single shot of a squad of 10 men. The down side of such a rapid firing weapon is the accuracy of the weapon leaves little to be desired. The weapon usually can hit with its first shot the second coming close the following shots will start to drift according to the dispersal dice.


The barrel melt down factor is dispersed among the six electrically spun barrels. The power is dispersed among three quick charge batteries on the side of the weapon. This design is a known problem with the weapon. Reducing the number of quick charge and release batteries reduces the firing rate of the weapon. Two batteries reduce the rate to 6 shots one batter is only 3 and no batteries reduces the shooting rate to one.


The entire power plant is housed in the back of the IG Dread. This is a G7 fusion power plant housed in an armored shell.

Erik

Tuesday, February 08, 2005

2005-02-05 IG Dreadnaught

What a long time since my last post I have been thinking more that working on my IG Dread.

After the comparison pictures of the last post I started disliking my IG Dread more and more. Well I actually did not like the upper body just the legs. The legs looked stumpy. In comes the hack and slash. I liked the expanded lower shocks I put on my IG Heavy Sentinel (http://wh40k.blogspot.com/). I wanted to keep the quad shock of the dread so off with the hips. I cut the Dread hip connections off and pipes that hang off the hips to the lower hinge. On the upper joint there are two raised rectangle pieces on the front of the joint. I filed these flat to receive the cross bar from the Sentinel. I plan to add piping similar to the back leg section of the Sentinel.


I then cut off the lower legs of the IG Sentinel above the hinge point to the shocks. I then drilled a hole through the i-beam looking part of the leg through one of the joints. This did split that part on the sides and I will have to fill in the depressions on the side of the leg.

I have to give credit where credit is due. I was going to use some spare vindicator extra armor plate I had from the Heavy Sentinel but after I saw this model I decided to use the spare track armor from the tank accessory spure. I took the small on to give the leg a little armor but not overpowering plus the way the Dreads weapons fit I could not put these any higher up on the leg.

When I went to put the main body on the hip joints I found that it was to low. I cut the Dread hip swivel portion off the hips. I shaved off the swivel point sentinel and glued that onto the place of the swivel.


I have added some armor for the side of the cockpit. I envision this heavy armored IG Dread to be put at the apex of a line and just drill out with its weapons (still under customization) and dropping a lot of rounds on the enemy. Thus I want to insure that the Dread had side armor as well. This armor was cut from the mud flaps of a Lemun Russ tank spur.


I have also added some supports for the motor box I am going to custom build soon.


Ever since I recieved the Epic scale Imperial Titan I have wanted to use its back component as an exhaust for another machine. I have started by triming this down to go on top of the brackets I added pictured above.


When I did several hack and slashes I ended up with several little cut pieces I added these to the base for looks.


Erik